In an effort to produce reliable quantitative angles of tilt and roll of the IMU module, it is necessary to calibrate all 9-axis vectors. Acceleration, gyroscope, and magnetometer are together calibrated together as a single system where reliable calculation and measurement of tilt and roll functions become achievable. In this post, an explanation of how the calibration is done to include visual verification leads to the successful application of tilt and roll measurement as demonstrated. To get an accurate approximation of tilt and roll measurements, calibration of all vectors is necessary. Effectively, this project provides a way to obtain tilt in two different directions using the BNO055 IMU module.

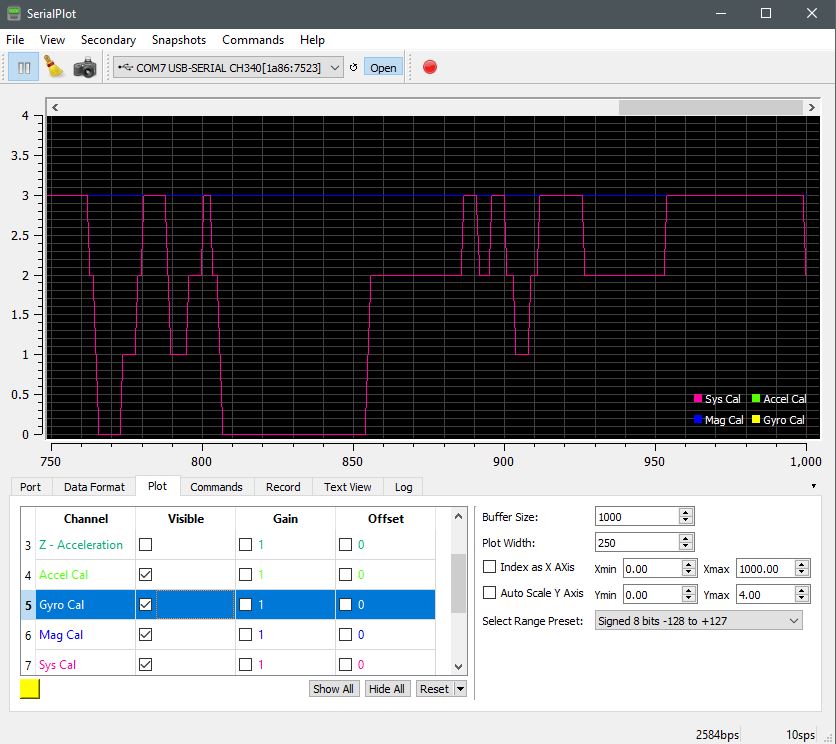
All four calibration categories must register in the data acquisition stream as 3,3,3,3. Three-axis together as three for each category to include the system which is the combined fused total of the three. When first running the IMU module, or after reset, the data readings will appear at 0 until all four settles into position as 3. To get each to settle (accel, gyro, mag, and sys), it is necessary to physically rotate the IMU module. Move the IMU around in a figure-8 motion and watch for the data readings to rise from 0 to 3.
Sometimes the numbers among all four columns will drop below three, but eventually, they will all four level-out at 3. At times a single column number will not get to three and can appear stubborn. So it is important to hold the IMU in 45-degree roll, tilt, and yaw increments for a few seconds each. That is usually the most effective approach to get all four vectors to align at 3,3,3,3. It is always important to keep the IMU unit away from sources of magnetism, or motors, or sources of EMI that could adversely affect calibration, or an ability to achieve calibration. Keep the IMU away from sources of EMI during calibration while watching for acc, gyro, mag, and sys levels visually plotted and quantitatively acquired in the data readings (see Text View tab).
When all four vector categories are in alignment, it then becomes possible to run tilt and roll tests to obtain reliable confidence in tilt and toll angles of measurement. Notice that the calibration legend is set by category within the Plot tab. Simply double click the Channel name to rename it to a label that is suitable. It is also necessary to set the Auto Scale Y-Axis to a readable number between 0 and 4. That way it is easier to see the variability in calibration by visual recognition. Otherwise, you rely solely on the 3,3,3,3, quantitative measures within the Text View tab as depicted in Screen Capture 1 above.
To monitor tilt and roll it will be necessary to deselect the acceleration, gyro, magnetometer, and system channels to disable the plot and legend. You may want to do this as more serial.print lines in code to display tilt and roll angles will plot separately as additional channels.
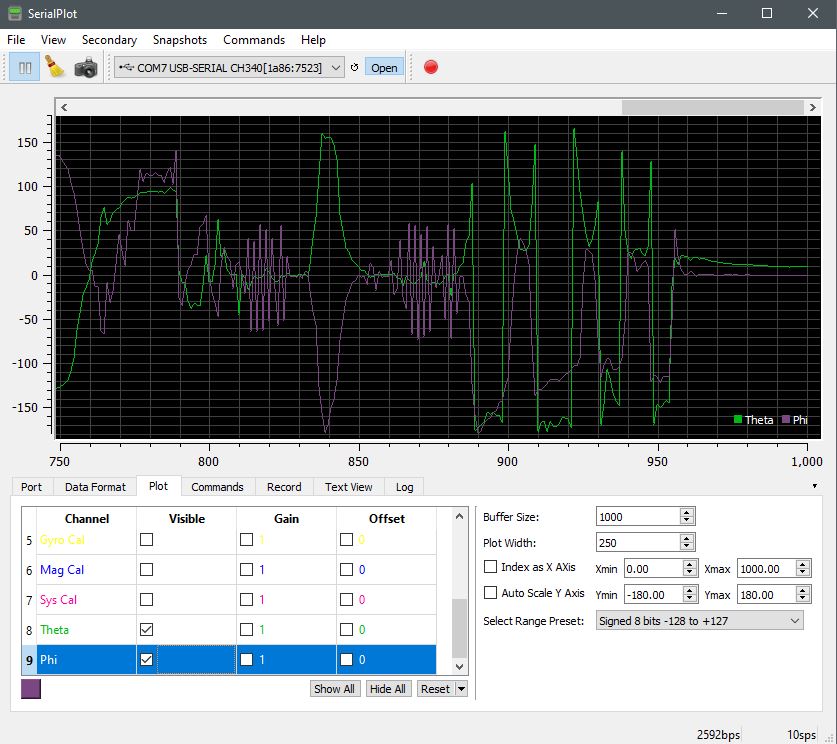
Once calibration is set and the plot graph is ready to display the angular channels (theta and phi), you can physically tilt and roll the IMU module to get positive and negative angles of movement and position. The calculated and plotted serial data that represents rotation along the y-axis is the name theta in this example. It represents a physical tilt action from up (positive) to down (negative) angles of movement. Conversely, the roll motion is physical rotation along the x-axis, so named phi in this example. Physical rotation along the x-axis right (positive) and left (negative) also get plotted and acquired within the data readings within the Text View tab.
As written about before, acceleration, gyro, and magnetometer, as separate categories, each has 3-axis degrees of freedom. Where all three together produce a total of 9-degrees of freedom. So, with each category, a unity of 3 for each gives us confidence that they are all together, yet separately, calibrated.
Project Review:
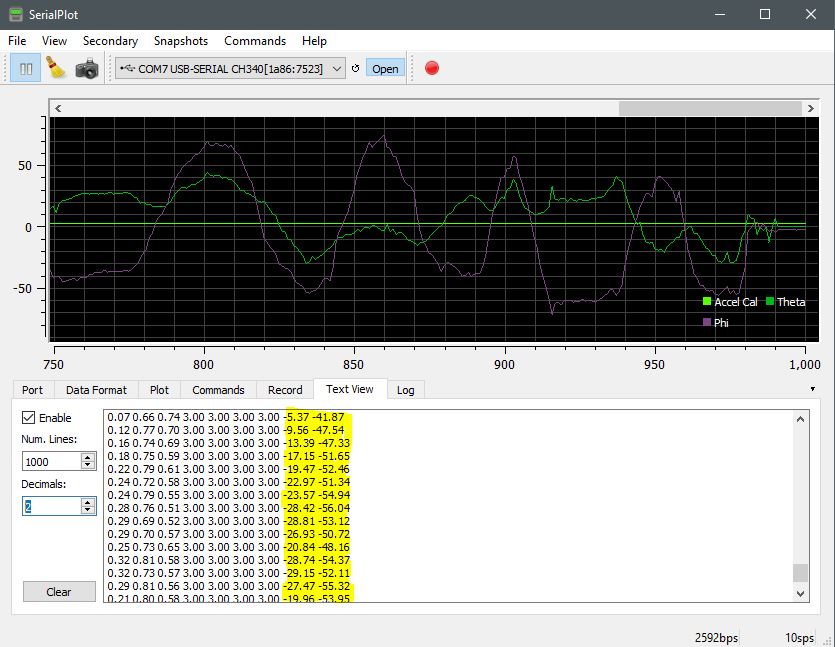
A physical demonstration is captured here both visually and quantitatively. As roll and tilt movement is applied to the IMU module, corresponding positive and negative angles of change become plotted and logged for quantitative analysis.
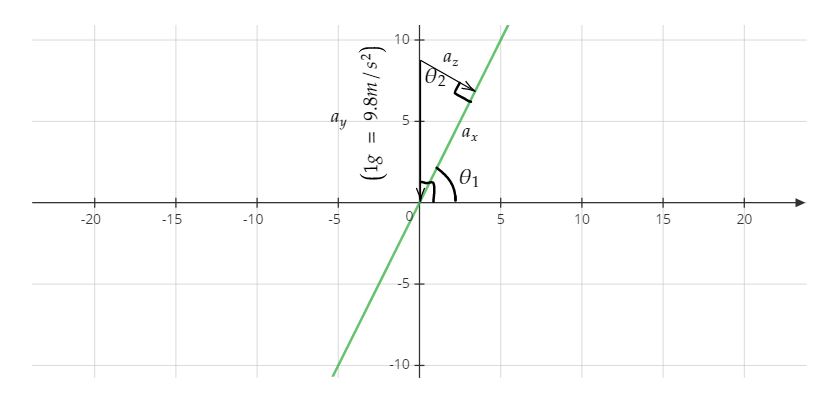
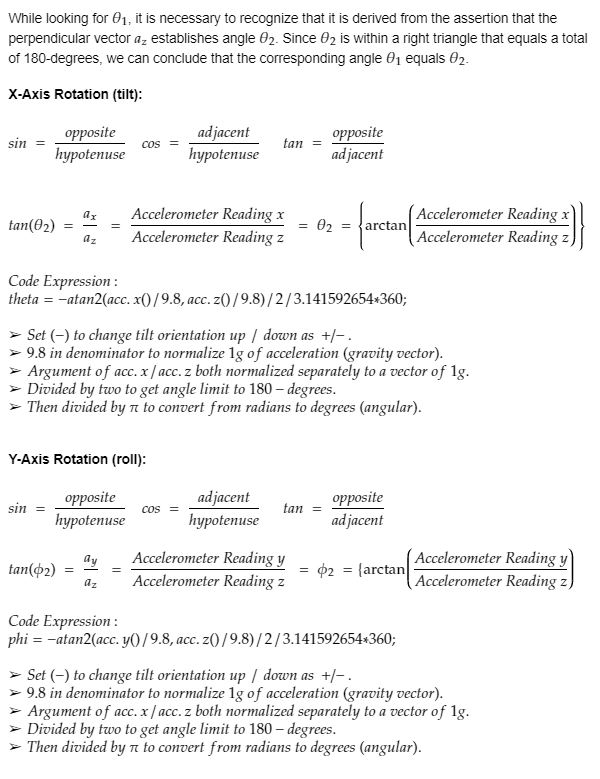
Tilt & Roll Calculations:
Code Example:
#include <Wire.h>
#include <Adafruit_Sensor.h>
#include <Adafruit_BNO055.h>
#include <utility/imumaths.h> //Within the Adafruit Unified Library
#include <math.h> //Permits inverse tangent function below
float theta;
float phi;
#define BNO055_SAMPLERate_DELAY_MS (100)
/* The myIMU object is self-declared. It can be named any identifier.*/
Adafruit_BNO055 myIMU = Adafruit_BNO055();
void setup()
{
Serial.begin(115200);
myIMU.begin();
delay(1000);
/* The in8_t is a very compact data type:*/
int8_t temp=myIMU.getTemp();
/* Instruction to use the onboard BNO055 VCXO, not on the MPU chip itself:*/
myIMU.setExtCrystalUse(true);
}
void loop()
{
uint8_t system=0, gyro=0, accel=0, mg=0; /*Byte sized variable data type */
myIMU.getCalibration(&system, &gyro, &accel, &mg);
imu::Vector<3> acc =myIMU.getVector(Adafruit_BNO055::VECTOR_ACCELEROMETER);
/*A calculated approximation of tilt (inverse tangent (ax/9.8) divided by (az/9.8)).
The 9.8 denominator in each term is to normalize the vector to 1-g for each variable.
Then dividing by 2 and 3.14 (pi) converts the measurement units to degrees.*/
theta=-atan2(acc.x()/9.8,acc.z()/9.8)/2/3.141592654*360;
phi=-atan2(acc.y()/9.8,acc.z()/9.8)/2/3.141592654*360;
Serial.print(acc.x()/9.8);
Serial.print(“,”);
Serial.print(acc.y()/9.8);
Serial.print(“,”);
Serial.print(acc.z()/9.8);
Serial.print(“,”);
Serial.print(accel);
Serial.print(“,”);
Serial.print(gyro);
Serial.print(“,”);
Serial.print(mg);
Serial.print(“,”);
Serial.print(system);
Serial.print(“,”);
Serial.print(theta);
Serial.print(“,”);
Serial.println(phi);
/* Insert delay to assure you’re not going faster than what the sensor can handle. */
delay(BNO055_SAMPLERATE_DELAY_MS);
}


